

| Orig. Posting Date | User Name | Edit Date |
| Jun 3, 2015 10:02AM | 66coop | |
| Jun 3, 2015 08:15AM | SXSMAN | |
| Jun 2, 2015 12:34PM | velopackrat | |
| Jun 2, 2015 08:35AM | wilhite | |
| Jun 2, 2015 08:24AM | dklawson | |
| Jun 2, 2015 06:48AM | Spitz | |
| Jun 2, 2015 06:40AM | 66coop | |
| Jun 2, 2015 04:25AM | DRMINI | |
| Jun 1, 2015 09:07AM | Spitz | Edited: Jun 1, 2015 09:09AM |
| Jun 1, 2015 08:29AM | velopackrat | |
| Jun 1, 2015 07:41AM | 66coop | |
| Jun 1, 2015 05:40AM | velopackrat | |
| May 31, 2015 06:22PM | 66coop | Edited: May 31, 2015 06:30PM |
| May 31, 2015 05:28PM | tvander | |
| May 31, 2015 01:33PM | Cup Cake | Edited: May 31, 2015 01:36PM |
| May 31, 2015 01:32PM | velopackrat | |
| May 31, 2015 12:50PM | CooperTune | |
| May 31, 2015 11:09AM | Cup Cake | |
| May 31, 2015 07:00AM | 66coop |

|
Total posts:
Last post: Mar 11, 2025 Member since:Jul 26, 2000
|
Cars in Garage: 0
Photos: 16 WorkBench Posts: 0 |
|
Just this morning I remember I had a number in my phone for a shop about an hour away that was sure to be able to do this. Sure enough, he said sure! Midnight Auto in northern NJ. Going to try and get up there asap.
|
|
Total posts: 1125
Last post: Nov 6, 2019 Member since:Jan 27, 2014
|
Cars in Garage: 0
Photos: 0 WorkBench Posts: 0 |
I made mine out of an adjustable reamer of the correct size, welded a longer shaft onto it and the turned the new shaft down to the bearing size.
There are a number of radius arm rebuild threads, If I remember correctly the technique I used was not considered the best, even though I would think it would stay centered in the bore for reaming.
Having driven a mini with a bent trailing/radius arm, I can tell you the importance of getting it right. The car could be a handful in the wet.
I've only found it fun to drift a mini when you wish to drift the car, not when it wants to.
|
|
Total posts: 247
Last post: Sep 1, 2019 Member since:Jun 26, 2012
|
Cars in Garage: 0
Photos: 0 WorkBench Posts: 0 |
|
I made mine from brass bar stock but I have the luxury of a lathe. You can buy bar stock from online places like McMaster Carr. It doesn't have to be brass - it could be nylon, Delrin or similar. I guess even aluminum would be fine but I used brass because it's soft and easy to cut.
Step 1, drill the bar center and tap to fit your all-thread.
Step 2, chuck up the all-thread with the brass nugget threaded on
Step 3, turn the brass to the size you prefer, either the bearing o.d. as Kevin prefers or the bearing i.d. that Doug and I prefer.
Step 4, like we all agree on, swarf is not your pal. Figure out a foolproof way to manage swarf.
|
|
Total posts: 473
Last post: Nov 21, 2019 Member since:Jun 29, 2011
|
Cars in Garage: 0
Photos: 0 WorkBench Posts: 0 |
|
Where did you get the brass fitting?
|
|
Total posts: 9241
Last post: Aug 17, 2023 Member since:Jun 5, 2000
|
Cars in Garage: 0
Photos: 0 WorkBench Posts: 0 |
|
How do you do them with the needle bearing out? How do you ensure the reamer is perfectly straight?
You make the reamer's brass/bronze guide bush the diameter that just fits where the needle bearing would be installed. As long as the guide bushing's bore and OD are concentric with minimal clearances the ream will be properly positioned.
Kevin, I made my ream to fit the needle bearings. I pack the reamer flutes with grease and advance the reamer slowly thru. Then I remove the reamer from the drill chuck and pass it the rest of the way through the arm without backing up. The swarf is caught by the grease and pushed/pulled through the arm by the guide sleeve on my reamer. It takes a bit of care but there is no swarf in the needle bearings when done.
|
|
Total posts: 13996
Last post: Mar 31, 2025 Member since:Jan 22, 2003
|
Cars in Garage: 4
Photos: 381 WorkBench Posts: 1 |
|
I'm guessing the bar would still go straight through, but the turned brass guide on the bearing end would be a tight fit to the bare "shell" of the arm
"Everybody should own a MINI at some point, or you are incomplete as a human being" - James May
"WET COOPER", Partsguy1 (Terry Snell of Penticton BC ) - Could you send the money for the unpaid parts and court fees.
Ordered so by a Judge
|
|
Total posts:
Last post: Mar 11, 2025 Member since:Jul 26, 2000
|
Cars in Garage: 0
Photos: 16 WorkBench Posts: 0 |
|
How do you do them with the needle bearing out? How do you ensure the reamer is perfectly straight?
|
|
Total posts: 8645
Last post: Dec 16, 2020 Member since:Oct 27, 2000
|
Cars in Garage: 0
Photos: 0 WorkBench Posts: 0 |
|
I always do them with the needle bearing out. The reamer can then go right through. Never fit the new needle bearing first, you will fill it with swarf from the reamer.
If you must ream it with the old bearing in, pull the reamer back out whilst still rotating it clockwise (ie cutting direction). Never reverse a reamer...
Kevin G
1360 power- Morris 1300 auto block, S crank & rods, Russell Engineering RE282 sprint cam, over 125HP at crank, 86.6HP at the wheels @7000+.
|
|
Total posts: 13996
Last post: Mar 31, 2025 Member since:Jan 22, 2003
|
Cars in Garage: 4
Photos: 381 WorkBench Posts: 1 |
|
So your brass fitting is the size of the arms hole without bearing fitted?......to allow the reamer to be pulled through that end?
edit: oops..just re-read your post stating the bearing is installed....how then is the reamer removed without rotating backwards...or does it simply pull out.
"Everybody should own a MINI at some point, or you are incomplete as a human being" - James May
"WET COOPER", Partsguy1 (Terry Snell of Penticton BC ) - Could you send the money for the unpaid parts and court fees.
Ordered so by a Judge
|
|
Total posts: 247
Last post: Sep 1, 2019 Member since:Jun 26, 2012
|
Cars in Garage: 0
Photos: 0 WorkBench Posts: 0 |
|
The brass centering sleeve is threaded - but that's not required. It could have been cone shaped, not threaded and held in place with a spring and a nut for example. The main thing is to support the reamer so it cuts a true hole in line with the bearing end. Start with a radius arm that is clean inside, with no leftover grease. All the shavings have to come out somehow, so any grease will capture the shavings.
Turn the reamer through by hand (T-wrench works great) and while turning you can extract it - once through.
|
|
Total posts:
Last post: Mar 11, 2025 Member since:Jul 26, 2000
|
Cars in Garage: 0
Photos: 16 WorkBench Posts: 0 |
|
It all seems to make sense. So, the brass end is threaded as well then, correct. As you turn the nut at the top, the treads begin to rotate through the brass bushing, pulling the reamer into the bore? Seems like you should never turn a reamer the opposite direction so how do you get it back out once done?
|
|
Total posts: 247
Last post: Sep 1, 2019 Member since:Jun 26, 2012
|
Cars in Garage: 0
Photos: 0 WorkBench Posts: 0 |
|
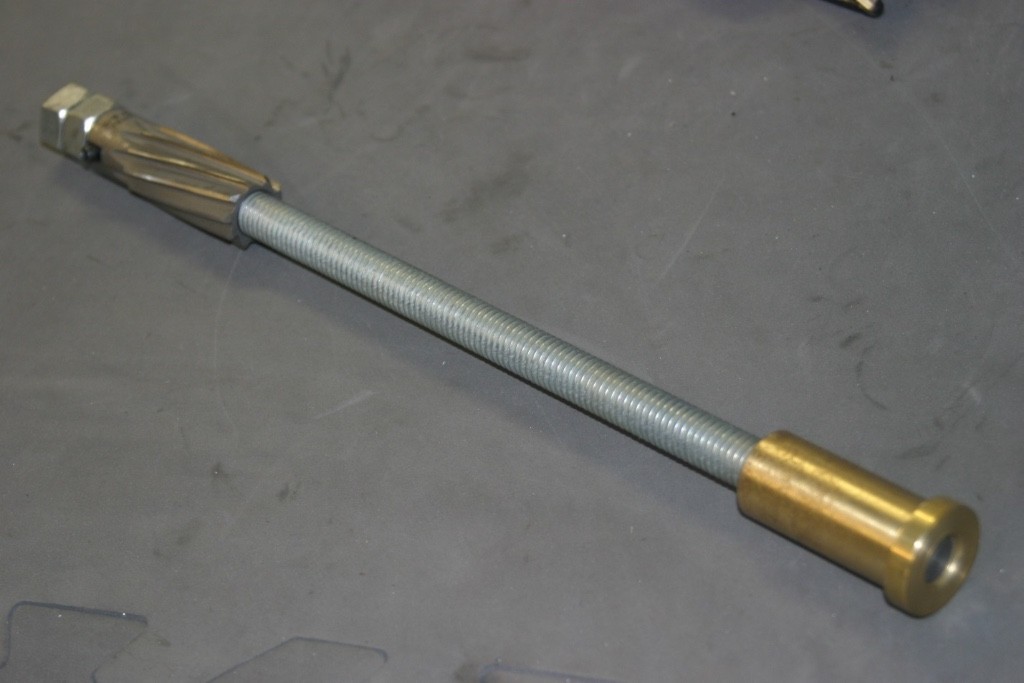
They are called 'shell reamers'. //www.ebay.com/itm/13-16-SPIRAL-SHELL-REAMER-HSS-OAL-2-1-2-HOLE-DIA-1-2-NEW-5-155-010-/390459459193?pt=LH_DefaultDomain_0&hash=item5ae9328679
The threaded rod is 1/2" all-thread. The straighter, the better![]() I had to turn the all thread on a lathe a few thou for the reamer to fit, then drill a hole through for a split pin to locate and secure the reamer. It might sound involved but didn't take long.
I had to turn the all thread on a lathe a few thou for the reamer to fit, then drill a hole through for a split pin to locate and secure the reamer. It might sound involved but didn't take long.
|
|
Total posts:
Last post: Mar 11, 2025 Member since:Jul 26, 2000
|
Cars in Garage: 0
Photos: 16 WorkBench Posts: 0 |
|
Thanks. That reamer looks very interesting. i may end up having to go that route. I'm going to start looking now actually. Any luck on where to find that reamer or what it looked like in its original state?
|
|
Total posts: 146
Last post: Dec 16, 2023 Member since:Feb 18, 2013
|
Cars in Garage: 0
Photos: 0 WorkBench Posts: 0 |
I used the above mentioned reamer and it was still too tight. I used a brake cylinder hone to open it a little, not my best option but when the machine shop did them last time, they only lasted a couple years so I'm not sure what they did....
|
|
Total posts: 10335
Last post: Aug 19, 2016 Member since:May 13, 2001
|
Cars in Garage: 0
Photos: 0 WorkBench Posts: 0 |
|
Interesting! I have access to the correct tool, so its not an issue for me, although I've only done one pair. I can say my arms and shoulders were somewhat achey after.
The power of accurate observation is commonly called cynicism by those who have not got it. G.B.S. Sarcasm is the lowest form of wit. Oscar Wilde
//www.cupcakecooper.ca/
|
|
Total posts: 247
Last post: Sep 1, 2019 Member since:Jun 26, 2012
|
Cars in Garage: 0
Photos: 0 WorkBench Posts: 0 |
|
I restored a Cooper S recently and wrote articles for MM along the way. Here's a chapter with a pic of the reamer I made and it didn't cost much. Did the job to a gnats ass too. The reamer needed is 13/16" which are not hard to locate - but the trick is to keep it on center. That's what the brass threaded collar does when inserted into the new bearing. BTW, getting the old bearings out was kind of unpleasant as I recall.
Good luck, you can do it!
//www.minimania.com/Snarkey_-_Chapter_6
|
|
Total posts: 4141
Last post: Jul 28, 2024 Member since:Oct 8, 2011
|
Cars in Garage: 0
Photos: 0 WorkBench Posts: 0 |
|
CC, not so. Having worked in an auto machine shop fo 25 years I can tell they don't. I picked up the reamer and a bushing on line from someone here years back. I then machined a couple more bushings that allow me to ream either welded or cast arms with or with out the inside bushings or needle bearing installed. As for lending such tools it does not work out. Turn a reamer the wrong direction and we have a issue. I have been trying to save the metal tubes inside old arms. Cleaning out the arms is important as well. The plastic replacements tend to split when greased. Steve (CTR)
|
|
Total posts: 10335
Last post: Aug 19, 2016 Member since:May 13, 2001
|
Cars in Garage: 0
Photos: 0 WorkBench Posts: 0 |
|
I would think a machine shop should be able to ream them with a lathe or milling machine.
The power of accurate observation is commonly called cynicism by those who have not got it. G.B.S. Sarcasm is the lowest form of wit. Oscar Wilde
//www.cupcakecooper.ca/
|
|
Total posts:
Last post: Mar 11, 2025 Member since:Jul 26, 2000
|
Cars in Garage: 0
Photos: 16 WorkBench Posts: 0 |
|
Trying to sort my rear arms currently. I dropped them off at the machine shop that has my motor But he is unsure he has the proper tool for the job. Can the proper tool be rented or does anyone know of a shop in NJ that has lots of experience reaming these bushings.
thanks a lot!


