Prepping the Original Mark1 Mini Cooper S 1275 Engine - Part 2
Hey everyone, Cole here with Classic Winding DIY and today's episode we are going to be tearing into the Cooper S blocks and heads to get them prepped to get repaired and refurbished for the Mark 1 Cooper S 1275 rebuild series. I'm really, really excited about this series.
Before we get into all of that I wanted to take a moment to level set on some things.
Now this is a genuine Cooper S block. There are ways that you can tell that but the main ways that you can verify this as a genuine engine are the casting on the back which is an AEG 312. That's something that was only in the Cooper S's here in North America.
Additionally there's a coolant drain passage on the back side of the block here with a special spout that actually allows you to drain out the coolant back there. Very very unusual. These two TAP-IT covers on the back here. This is something that was only on early engines.
And then of course the crank, the pistons, and the connecting rods that were in in this. All of those are specific to this block and this setup and furthermore the studs that are actually being used to hold the main caps on later cars and later blocks actually used bolts instead of studs.
Now as far as the heads go both of these heads are the AEG 163 heads. On these are early heads were also genuine to this block combination. Now where I think the confusion came in was genuine to this block combination.
There was an Austin America or MG 1100 three synchro gearbox on this engine. And with that gearbox, people were thinking, well, why in the world would a Cooper S engine have a three synchro box on it like that? And why would it have a single row timing chain? Why would it have that big extended timing chain plate?
So the reason that engine had those things on it was because this engine was taken out of a Cooper S. It was removed from a Cooper S and put into an MG. And so as a result the block in the head could be kept the same because they were largely the same between those two different cars.
But the gearbox had to be changed and the timing cover and system had to be changed so it could be properly supported and inserted into that MG vehicle. There was never a situation where this Austin America style remote style gearbox was actually put into a Cooper S. It was actually the other way around which kind of explains all of this stuff. And the last point that I want to make around this is people who are mentioning, well the heritage certificate is going to verify whether or not this was correct.
Well, the heritage certificate confirmed this. Both of these engines, namely the one that we will be assembling and putting in the car, is a numbers matching engine. The plate was already taken off here so that Will, the owner, could actually get a new plate made up and sent over to me for reassembly.
So if you're wondering why isn't that plate there, that would be why. And so we'll be taking the engine that came out of the car that we are going to be putting this back into and continuing to keep it a numbers matching car. The only difference is that the gearbox we're going to be using is an empty casing.
I keep looking over here because it's actually sitting off to the side here but it's an empty three synchro casing with the Mini Cooper S style output which if you guys haven't seen before. This is a Cooper S style output or a remote style output made for a mini. The difference between this and an Austin America style is that these bolts right here are on the bottom of the space. So this actually sits like this out the back of the car with the shifter assembly connected up and bolted up from the bottom on the Austin America style.
On the Austin America style, both of those are sitting off screen here, they're just too heavy to show you guys like this, have bolts that go inside. And so that's a really fast way to see whether or not the remote gearbox you have is, well, for a Mini or for an Austin America MG 1100, those types of builds.
Hopefully that clarifies a few things.
So let's get into the engines now and this is kind of where the fun part starts.
Obviously disassembly is a fun project in itself but what we're going to be doing today is taking apart the two heads, basically just removing the valve springs, and I'm going to get a little wire brush and check both of these heads before we send them off to the machine shop. And you guys might wonder what machine shop are we going to be using? Well, if you guys have been with the channel for a little bit you know that I partner with HRE IRL, that's Paul Hickey over in Ireland. We do a monthly live stream and if you haven't seen that you should definitely tune in for that.
We have a lot of fun basically just talking shit the whole time, which is the best kind of hanging out, I think, but he is going to be doing a full and complete rebuild of these heads. I thought about this for quite some time, and I realized there are people here in the US who can rebuild cylinder heads, but nobody is gonna do it to the quality that Paula's gonna do it, and of course, you guys will be able to continue to watch the full rebuild process on his channel which should be pretty cool.
But before we get those shipped over because these are two really heavy cast iron heads I want to make sure that there's no cracks in them. So let's jump over to the venture real quick we'll get all the valve springs out keep everything numbered and ordered and then we'll check and see if there's any cracks. Fingers crossed.
Alright, so the first thing that we are going to do here is get these valves out. Lightly clamp this in your bench vice here. I find that this is pretty easy to hold it in place if you don't have like a big milling table like some people do. And just one thing to keep in mind is you'll want to use a softer metal teeth over here so that you don't damage the head.
But we are going to be skimming this as well to get a nice clean finish on it. Alright so what I like to do before getting into something like this is to kind of just label these. Now unfortunately my paint pen doesn't work the way I was hoping it would so I'm going to be just marking this. This way I know which cylinder they came out of.
Pretty straightforward stuff. All right, and with those labeled, the next thing that we can do is actually put the spring compressor on and get these valve springs out, as well as all of the valves.
Now one thing you're going to want to do when you're taking these apart is to keep these little valve collets. These are weirdly expensive and sometimes these are extremely hard to find, especially if you have some early valves. These things that aren't necessarily made anymore.
Very, very good to keep a hold of these. Nice and cruddy. So this is probably what it's going to look like when you get in there. You're going to have your valve that is probably really, really cruddy and dirty, especially if it's an older engine, an older head.
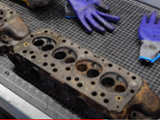
And then what we're going to do is once we get all of these out, we are going to wire wheel this, get it cleaned up really, really good, because apparently these are prone to cracking. I have not seen one that's cracked before but this style head apparently can crack pretty pretty regularly unfortunately. And cylinder head number one disassembled as far as I can do it. Let's flip it over so you guys can see what the other side looks like.
So you can see on the other side here that some of the valve stem seals also did not want to come off. That's pretty normal. You can kind of peel them off. They're all bad. That's not something that you would want to reuse. But surprisingly all of these valve guides themselves actually look pretty good. I mean considering that this is a super super rusty head I don't see any cracks just yet.
Now to get a real assessment of the kind of cracks, anything deeper than something that's visual, is you have to do something called MagnaFlux. It's kind of a dye based assessment and basically they inject a dye into these heads and it outlines and shows all the cracks that are present in the head itself that you wouldn't be able to see with your naked eye.
So that's always a pretty cool process. I'm not sure if Paul is going to be able to show you that or not. I think he uses a third party for it.
We are going to get the other head disassembled and then we are going to wire brush these down. Okay so these have sat in kind of a degreaser for a few days and I got them wiped up and for a few days and I got them wiped up and cleaned up just a little bit.
Nothing too wild and crazy because obviously these are going to go for like a professional parts cleaning once they get to Ireland. But what I want to do before we ship them out there is to really inspect the valve areas here. And then, of course, the flip side of this to check for any visible cracks. Now, this is something that the machine shop would normally do for you, but since we are shipping these I want to do my due diligence here.
All right so now we have you know a pretty good kind of etch on these and so these and so far I don't see any visible cracking. There's a lot of pitting around this valve right here but don't see any cracks. Now that's not to say that there aren't any. It's very possible there still are and of course my wire wheel isn't small enough to get into these sidewalls in here, but I think at least the bottom side of this head is good.
Let's get the other one in front of us here now. Obviously there are other places these things can crack on the bottom side here namely and underneath the valve seats. These sections of the valves the actual tapered sections are a recessed insert. And so these will get removed, but the new ones will have to get pressed in, and then the new valves, the actual slope gets cut to the valves.
So underneath all of those there could be cracking. It's possible. Hopefully, you know, we always hope for that not to be the case, especially with these old head castings, because they don't make them anymore and it would be cool to keep it all original. But so far I don't see any signs of cracking or anything like that. But we still need to check the rocker side. This side here is also apparently pretty prone to cracking namely around these sections here and these sections here and where the rocker assembly actually sits down on it. So let's get that cleaned up next.
Now there's something kind of interesting. There's a difference between the castings in these heads I've not seen before. Granted I don't have a lot of experience with these AEG 163s, but they're both the same head casting. But look at the valves here. These valves and these valve guides specifically have a stepped, a raised step down there, whereas these over here appear not to. There's no, and I think it's actually part of the head casting, I don't think it's part of the of the valve guide. It's really hard to tell, but its really really interesting. And so in the one on back, the inner springs here would sit right down onto the head, but the ones up front would actually sit on the valve guide, almost like the springs were also holding the valve guide in. I mean, obviously that's not what it's doing, but maybe it has some sort of assistance there.
Pretty interesting. So no step on the back, and then step on the front. Okay, so with that these are now ready to go off to Paul in sunny Ireland. So I'm going to be sending him this plus an additional rocker assembly that the owner has found and they are all going to get rebuilt. So the heads are going to get rebuilt and the rocker assembly. He'll have two beautifully rebuilt cylinder heads so maybe we can use them on both engines or he can have a spare. Very very exciting stuff and if you guys want to keep an eye on that whole in-depth rebuild process on these heads make sure that you head over to Paul's YouTube channel and subscribe because he is going to be covering that on his channel.
One other thing I did want to mention is that these two primary gears are the gears that came off of the early cranks for these engines and we want to keep and reuse these.
So we are going to be sending these out to Paul as well and he is going to re-bush them for us so it's ready to be used and in tolerance and there's no problems with it. So all this, exciting stuff. All right, so with that we have all of the parts kind of disassembled off to the machine shop, off to the soda blaster, off to Ireland. They are off everywhere.
So it's going to be a little bit before all that stuff comes back, probably a week or two if I had to guess for the engine and most of the smaller bits. And then of course the cylinder heads. It kind of depends on how long it takes for it to get to Ireland and then of course how long it takes to get back.
But that is going to wrap up today's episode. I hope that you guys found it interesting and if you have any questions about the things I said at the beginning of the episode or anything that I did in the middle or at the end, post those in the comment section below.
Also, if you like this series, don't forget to subscribe and hit the like button. You know the drill. Enjoy those
To See the Original, go to Classic Mini DIY